|
Advance Digital Image Enhancement Method |
Keystrokes are for Macintosh
 Skills needed to perform this lesson: This
lesson assumes completion of the "Advanced Selection Lessons" or a good
working knowledge of "selection skills"… especially "Quick Mask".
Skills needed to perform this lesson: This
lesson assumes completion of the "Advanced Selection Lessons" or a good
working knowledge of "selection skills"… especially "Quick Mask".Objective: Understand total photographic control of "Grouped Adjustment layers".
File(s) Needed: [Lesson6.psd]
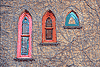
| 1. Open "Lesson6.psd" file 2. Make only the "rectangle" layer active and visible [Option+Click Eye] 3. Make a rough selection of the entire window including the frame. Then: |
||
| a) Enter "Quick Mask Mode";
Refine mask then Exit "Quick Mask Mode" …see Quick Mask in "The Method" |
||
| 4. Create a Layer Mask of the selection: [Click Layer-mask Icon] | ||
|
Notice: |
||
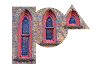
| 5. Make all
layers visible [Option+Double
Click Eye] on any layer
"non Adjustment Layer" 6. Create and name a new Snapshot "Lesson8" then switch between Snapshots "Lesson 6 & 8" Observations: |
||
|
||
| 7. Create multiple "Grouped Adjustment layers": | ||
| a) make all layers
active and visible: [Option+Double
Click Eye] on any "non Adjustment
Layer" b) make the "circle" layer active c) create a "Grouped Adjustment layer": [Command+Click-layer icon] -> Select: Type = "Brightness/Contrast" and check "Group With Previous Layer" -> Enter [Brightness = 20 / Contrast = 30] d) turn off/on the new "Grouped Adjustment layer" and observe the changes. |
||
| 8. Save snapshot "Lesson8" and close "all" files and end lesson | ||
| a)
From History Palette, select snapshot "Lesson8" b) Create an new document from current state …[Click-left icon] bottom of palette c) Save as "Lesson8.psd" and close all files |
||
revision
2.2
 a)
Holding the "Command" key click on the "circle"
layer
a)
Holding the "Command" key click on the "circle"
layer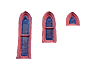 a)
Holding the "Command" key, click on the mask of the "circle"
layer
a)
Holding the "Command" key, click on the mask of the "circle"
layer