Advance Digital Image Enhancement Method
Utilizing Layers... Reading: Chapters 1,2,3 - Studio Techniques by Ben Wilmore
Lesson 4: Active layer; Photo analogies and Apply Image adjustments
Keystrokes are for Windows
Objective: Apply photo techniques to selected layers. Save often!

File(s) Needed:
CONTINUING from Lesson3...
1. Apply different photographic techniques to each window layer:
  a) make "rectangle" layer active and adjust for brightness and contrast:
Menu: >Image>Adjust>Brightness/Contrast… enter [Brightness = 30 / Contrast = 30]
b) make "circle" layer active and adjust for color balance:
Menu: >Image>Adjust>Color Balance… enter [60 Red / 0 Green / - 60 Blue]
c) make "triangle" layer active and make it negative:
Menu: >Image>Adjust>Invert
2. Create and name a New Snapshot:
- Go to History Palette, [Alt+click middle icon at bottom of palette] and name it "Lesson4"

3. Review "Snapshots" and notice changes in Layers Palette:

  - Drag "History Palette" out of palette group
- Mouse click different "Snapshots" and observe Layers Palette
Revision 2.3

A.D.I.E.M. ©
Bob DiNatale
Utilizing Layers... Reading: Chapters 1,2,3 - Studio Techniques by Ben Wilmore
Lesson 5: Grouped Layers and Layer Opacity
Keystrokes are for Windows
Objective: Understand control available with "Grouped" layers by creating color layers and group with photo layers.
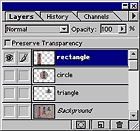
File(s) Needed:
CONTINUING from Lesson4...
1. From the "History Palette" select the snapshot named "Lesson3"
2. From the "Layers Palette" make just the "rectangle" layer active and visible: [Alt+Click Eye] to the left of "rectangle" layer.
3. Create and "group" a RED color layer with the "rectangle" layer:
  a) Create a new (empty) layer above "rectangle" layer and name it "red"
b) Fill empty layer with a RED color: make
foreground color RED [R=255 G=0 B=0] then [Alt+delete]
c) Group "red" layer with "rectangle" layer: Menu: >Layer>Group With Previous Layer
{notice how red layer is full but image has shape of layer "grouped" below}
d) make Grouped Layer 50% transparent: type 50 in Opacity box at top of "Layers Palette"

4. Create and "group" a GREEN [R=0 G=255 B=0] color layer with the "circle" layer:

  {Repeat same as "red" above except in step 3a name the layer "green"}
5. Create and "group" a BLUE [R=0 G=0 B=255] color layer with the "triangle" layer:

{Repeat same as "red" above except in step 3a name the layer "blue"}

6. Make all layers visible, show "History Palette" then create and name a New Snapshot "Lesson5"
7. In the "History Palette", switch
between snapshots "Lessons2 & 5" and view "Layers"
Observations:


- Windows in "Lesson5" looks similar to those from "Lesson2" but we did not have to cut shapes
- File size of "Lesson5" is smaller than "Lesson2" (view in status bar)
- Dynamic advantage of Grouping layers:
1. Change the image state to "snapshot lesson 5":
... a) "make just the "red" &"rectangle" visible with the "rectangle" layer active
... b) Use eraser tool on "rectangle" and watch "red" layer shape change dynamically
2. Change the image state to "snapshot lesson 2"
... a) "make just the "red" &"rectangle" visible with the "rectangle" layer active
... b) Use eraser tool on "rectangle" and notice the
"red" layer shape remains unchanged
Revision 2.5

A.D.I.E.M. ©
Bob DiNatale
Utilizing Layers... Reading: Chapters 1,2,3 - Studio Techniques by Ben Wilmore
Lesson 6: Grouped Adjustment layers
Keystrokes are for Windows
Objective: To understand "Grouped Adjustment layers".
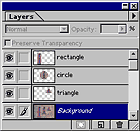
File(s) Needed:
CONTINUING from Lesson5...
Create grouped "Adjustment Layer" above each photo layer:
1. From the History Palette select the snapshot named "Lesson3"
2. From the Layers Palette make ALL layers visible
3. Create and "group" an "Adjustment layer" with the "rectangle" layer:
  a) make the "rectangle" layer active
b) Menu: >Layer>New> Adjustment Layer:
-> Select: Type = "Brightness/Contrast" and check "Group With Previous Layer"
-> Enter [Brightness = 30 / Contrast = 30]
4. Create and "group" an "Adjustment layer" with the "circle" layer:
  a) make the "circle" layer active
b) create "Grouped Adjustment layer" with shortcut …[Ctrl+Click-layer icon]
-> Select: Type = "Color Balance" and check "Group With Previous Layer"
-> Enter [60 Red / 0 Green / - 60 Blue]
5. Create and "group" an "Adjustment layer" with the "triangle" layer:
  a) make the " triangle " layer active
b) create "Grouped Adjustment layer" with shortcut
…[Ctrl+Click-layer icon]
-> Select: Type = "Invert"
6. In the History Palette, create a New Snapshots and name it "Lessons6"
7. Switch between snapshots "Lesson4 & 6" and view "Layers Palette":

Observations:

- The images in Lesson 4 and Lesson 6 look exactly the same but in Lesson 4 the pixel values were permanently changed and would be difficult to return to its original state.
- In Lesson 6 the adjustable layers allows for unlimited readjustment (or removal).
- The file sizes of Lesson 4 & 6 are similar. Adjustment layers do not add significantly to file size.

Revision 2.2

A.D.I.E.M. ©
Bob DiNatale
Utilizing Layers... Reading: Chapters 1,2,3 - Studio Techniques by Ben Wilmore
Lesson 7: Change Adjustment layer and Save from History Palette
Keystrokes are for Windows
Objective: Understand total photographic control of "Grouped Adjustment layers".

File(s) Needed:
CONTINUING from Lesson6...
1. From the History Palette select the snapshot named "Lesson6"
2. Readjust Color Balance of the "circle" "Grouped Adjustment layer":
  - Double click the "Color Balance" to show Color Balance menu
-> Change the Blue value from -60 to +60 then click "OK"
3. Create, Save and Close new documents from "History Palette":
  a) From History Palette, select snapshot "Lesson4"
b) Create an new document from current state …[Click-left icon]
bottom of palette
c) Save new document and Close

d) From History Palette, select snapshot "Lesson6"
e) Create an new document from current state …[Click-left icon]
bottom of palette
f) Save new document and Close
4. Close "PSPWindows.psd" [if prompted to Save "click "No"]
5. Replace History Palette back into Layers Palette Group
Conclusion:

Adjustment layers use little memory and file size and are infinitely adjustable.
Revision 2.3
PREVIOUS Lessons
Home
NEXT Lessons