Advance Digital Image Enhancement Method
Activity: Utilizing Layers... Reading: Chapters 1,2,3 - Studio Techniques by Ben Wilmore
Lesson 1a: Basic Layer functions:
Keystrokes are for Windows... for lesson with Macintosh keystrokes Click here
Objective:
Create new; make active; name and prioritize layers.

File(s) Needed:
PSPwindow.TIF
1. Open "PSPwindow.TIF" file and optimize using Menu:>Image>Adjust>Levels
2. Create a rectangle selection box over the left window
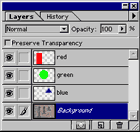
3. Make a new layer and name it "red": Menu:>Layer>New: "red"
4. Change foreground color to RED [R=255 G=0 B=0] and fill selection: Menu:>Edit>Fill:Foreground color
5. Create a circle selection over the middle window
  < Use the Menu: >Select>Transform Selection to adjust and position the circle
6. Make a new layer: [Click "New layer" Icon] at bottom of Layers palette
7. Change foreground color to GREEN
[R=0 G=255 B=0] and fill circle selection [Alt+delete]
8. Create a triangle selection over the right window using the Polygonal Lasso tool
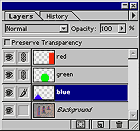
9. Make and name new layer "blue": [Alt+"New layer" Icon]
10. Change foreground color to BLUE
[R=0 G=0 B=255] and fill triangle selection [Alt+delete]
11. Double click "green" circle layer and name it "green"
12.
Click the "Background" layer to make it activeNotice it is highlighted and has a paintbrush icon
13. Rearrange the layer's priority from top to bottom so the order is: "red"/"green"/"blue"
  a) Click and hold mouse on the "red" layer then drag it to the top of the stack
b) Click and hold mouse on the "green" layer then drag it between the "red" and "blue" layers
14. Close file: Menu: >File>Close - you will be prompted to Save…Click "Yes"
  Notice filename: "PSPwindow.psd"...Photoshop will not overwrite the TIF file because layers can only be saved in a Photoshop [.psd] file
revision 3.0

A.D.I.E.M. ©
Bob DiNatale
Activity: Utilizing Layers... Reading: Chapters 1,2,3 - Studio Techniques by Ben Wilmore
Lesson 1b: More Basic Layer functions:
Keystrokes are for Windows
Objective:
Learn various ways to "undo"; History Palette & Snapshots; link and move Layers.

File(s) Needed:
CONTINUING from Lesson 1a...
15. Open "PSPwindow.psd" file
16 Make "red" layer active and with "Move" tool, move "red" rectangle to right of image
17. Press [Ctrl+Z] to Undo the move
18. Again, move "red" rectangle to right then make "blue" triangle layer active and move to left
of image
19. Press [Ctrl+Z]... only the triangle returns… [Ctrl+Z] has 1 Undo!
20. "Revert" to the last time the file was saved: Menu: >File>Revert
21. Move "red", "green" and "blue" shapes to bottom of image and arrange from left to right: "blue" triangle/ "green" circle/ "red" rectangle…
22. Show "History" Palette: Menu: >Windows>Show History
 

- Click snapshot named "PSPwindows.psd"…image will revert to original state when opened
- Click on the top line; the next line and the bottom line"…will revert to last 20 changes made
- With the bottom line selected create a new "snapshot"… click middle icon at bottom of palette
- Click and re-click each snapshot…notice how each saved snapshot reverts to that state of the image
- Leave the image in it's last state: Click snapshot named "Snapshot 1"

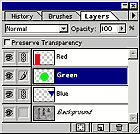
23. Show "Layers" Palette: Menu: >Windows>Show Layers or Click "Layers Tab" in palette group
24. Link "red", "green" and "blue" layers
  - Make any of the "shaped" layers active
- Click to left of the thumbnail icon of the other 2 "shaped" layers
… a (chain) link symbol will appear to the left of the thumbnail
- With any "linked" layers active, use the move tool and move the shapes to the top of the image
- With the "circle" layer active, Rotate "linked layers": Menu: >Edit >Transform >Rotate 180°
< Move and Layer transformation edits effect all layers that are "linked">
25. Show "History Palette" and click snapshot named "PSPwindow.psd"
26.
Close file [if reminded to save click "Yes"]
27. Reopen PSPwindows.PSD file…History is NOT saved… it's available only during the current session!
revision 2.3

A.D.I.E.M. ©
Bob DiNatale
Utilizing Layers... Reading: Chapters 1,2,3 - Studio Techniques by Ben Wilmore
Lesson 2: More Layer functions
Keystrokes are for Windows
Objective:
Create 3 new layers containing "windows" in the shape of "red", "green" and "blue" layers. Learn how to "select" layer shape; create a "New Layer via Copy"; adjust Layer Opacity and turn layer on and off.
1. If not opened, open "PSPwindow.psd" file
2. Create new layer containing a portion of the "Background" similar to the shape of the "red" layer
 

a) Make the "Background" layer Active
b) Create a selection the same shape as the "red" layer: [Ctrl+Click] "red" layer
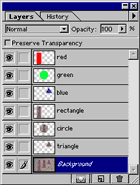
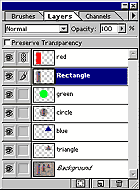
c) Create a new layer with a portion of the "Background" and name "rectangle": Menu: >Layer>New>Layer Via Copy or [Ctrl+Alt+J]

{Repeat with "green" and "blue" layers and name layers "circle" and "triangle" respectively}

3. Shut off "Background" layer by clicking on the layer "eye" icon.
4. M
ove shaped photo layers under same graphic shapes:

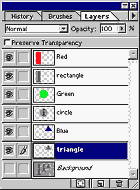
- "rectangle" under "red" layer
- "circle" under "green" layer
- "triangle" under "blue" layer

5. Change opacity of the "red" layer to make it transparent:
  a) Make the "red" layer Active
b)
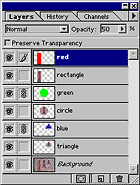
Change the "Opacity" setting at the top of the Layers palette from "100%" to "50%"
{ Repeat with "green" and "blue" layers.}
6. Create a New Snapshot and name it "Lesson2": [Alt+click middle icon] bottom of History palette
7. Click the layer "eye" icon to make various layers visible and invisible. Observe the change.

A.D.I.E.M. ©
Bob DiNatale
Utilizing Layers... Reading: Chapters 1,2,3 - Studio Techniques by Ben Wilmore
Lesson 3: Still More Layer techniques:
Keystrokes are for Windows
Objective: Learn techniques to link; move link; duplicate; delete and merge link layers.
File(s) Needed:
CONTINUING from Lesson2...
1. Link graphic layers ("red"; "green"; "blue") with shaped photo layers:
  - Link layers:

"red" with "rectangle"
"green" with "circle"
"blue" with "triangle"

2. Make the "Background" layer visible and in 3 moves, make each layer pair active then move them so there are 6 windows showing:
3. Show "History Palette" revert to previous state by and clicking on the "Lesson2" snapshot
  {notice the layers revert back to their position but the visible state of the layer does not}
4. Show "Layers Palette" and Duplicate layer:
  - drag any layer to the [new layer icon] at bottom of Layers palette
5. Delete layer:

- drag the newly duplicated layer to the [trash can icon] at bottom of Layers palette
6. Merge and Delete "graphic shape layers":
  a) Make the "red" layer active and link with the "green" and "blue" layers
b) Merge "linked" layers: [Ctrl+E]
{notice}
... the "green" and "blue" layers merged with the "red" Active layer
...also,
the active layer must be visible for layers to be merged
c) drag "red" layer (containing green and blue graphic) to the trash can icon
7. Create and name a New Snapshot "Lesson3":
  - Go to History Palette then [Alt+click middle icon] at bottom of palette
Last Updated: 2/12/02