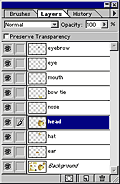
 1. Open "PSPselection.PSD"
file created in Lesson 2
2. Move and prioritize layers
to compose face:
|
{reference
example in upper right corner}
|
| 3.
Prioritize and rotate the "ear": |
| |
a)
Make the "ear" layer active and place it under
the "head" layer.
b) Rotate ear from menu: >Edit>Transform>Rotate
90° CCW |
|
| 4.
Link and Merge layers: |
| |
 a)
make all but the Background" visible and make the "head"
layer active a)
make all but the Background" visible and make the "head"
layer active
b) link all BUT the "eyebrow" layer (notice "link" icon
to the right of "eye")
c) merge linked layers from the menu: >Layers>Merged
Linked or
[Ctrl+E] |
Observation:
The "eyebrow" probably shows some white and needs to
be removed. We can make a more refined selection using the
Quick Mask Mode.
|
1.
Make "Background" active
2. Use the "Rectangle Marquee" to select an area slightly
larger than the Radish
3.
Create a new layer of the selection: [Alt+Ctrl+J]
and name it "eyebrow2"
4. Make only the "eyebrow2" layer active and visible [Alt+eye]
5. Zoom in by drawing a bounding box around the Radish
with the "Zoom" tool
6. Make a rough selection around the Radish
using the "polygonal lasso" as in Lesson 2
7. Press "Q" to enter "Quick Mask Mode"
and refine the selection: |
| |
-
Use the "Paint Brush" tool, to "add" or "subtract"
from the Quick Mask: |
| |
-
[black] blocks (adds to the mask) and [white] clears
(removes the mask)
- "X" on the keyboard toggles between black and white
- the left bracket "[" selects the next smallest brush
- the right bracket "]" selects the next largest brush
Note: it's better to make the selection slightly
smaller than the object
|
8.
When done, press "Q" to exit Quick Mask and return to "Selection"
(marching ants).
9. Invert the selection Menu:
>Select>Inverse then press [Delete]
10. Make just the "eyebrow 2" and the
"head" layers visible and reposition the "eyebrow
2" layer |
|
|
11. Flatten, crop and save file: |
| |
a)
flatten file from the menu: >Layers>Flatten
Image (Discard hidden layers? OK)
b) create a box around finished head with the "crop tool"
then press [Enter]
c) from the menu: >File>Save
as "MellonHead.TIF" and end lesson |