Photoshop for Photographers ©
Bob DiNatale
Layers:1 to 3 Layer Basics ...for Everyone!
Keystrokes are for Windows... For lesson with Macintosh keystrokes Click here

Activity L1/101: Creating a New Layer.

Open the file PSPcollage_A.jpg


- If the "Layers Palette" is not displayed from the menu choose:
>Windows>Show Layers


2 Methods to Create a "New" Layer:
Method 1: Using the Layers menu
  - from the menu choose: >Layers>New>Layer: OK
(PS assigns a sequential Layer # - in this case "Layer 1"

(delete "Layer 1" layer by dragging it to the "trash can" at the bottom of the Palette )
Method 2: Using the Layers Palette
  - click the "new layer" icon at the bottom of the Layers Palette
- Rename the layer by double clicking the name "Layer 1" and typing "new layer"
(delete "new layer" layer by dragging it to the "trash can")

3 Methods to "Duplicate" a Layer:
Method 1: Using the Layers menu
  - from the menu choose: >Layers>Duplicate Layer: OK
(delete "Background copy" layer by dragging it to the "trash can"
)
Method 2: From the Layers Palette
  - click the arrow located at the top right of the Layers Palette
-
select "Duplicate Layer"; name the layer by typing "new layer" then "OK"
(delete "new layer" layer by dragging it to the "trash can" )
Method 3: By Dragging layer to the "new layer" icon at the bottom of the Palette
  - select "Background" layer and drag it to the "new layer" icon
- double click the layer name "Background copy" and rename it to "new layer"
(delete "new layer" layer by dragging it to the "trash can" )

All above methods duplicate a new layer to the same file. Photoshop also allows for new layers to be duplicated to a new file. Let's proceed to the next activity to explore this and other layer features.

Revision2.0


Photoshop for Photographers ©
Bob DiNatale
Layers:1 to 3 Layer Basics ...for Everyone!
Keystrokes are for Windows... For lesson with Macintosh keystrokes Click here

Activity L2/101: Creating a collage from using multiple layers.


1. Open 3 files PSPcollage_A; _B & _C.jpg
2. Duplicate a Layer to a new file:
  - select PSPcollage_A.jpg image
-
click the arrow located at the top right of the Layers Palette and select "Duplicate Layer"
-
rename "Duplicate: Background" and name it "As" "dunes 1" and for "Destination" box select "Document" = "New" and "Name" = "collage"
(re-
select PSPcollage_A.jpg and close the file)

3. select PSPcolage_B.jpg image only this time:


- "Duplicate: Background" and name it "As" = "dunes 2" and for "Destination" box select "collage"
(re-select PSPcollage_B.jpg and close the file)

4. select PSPcolage_C.jpg image only this time:


- Duplicate the "Background" layer by dragging the image icon in the Layers Palette on to the "collage file.
- double click on the layer name and rename it to "moss"
(re-select PSPcollage_C.jpg and close the file)

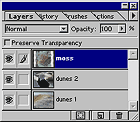
>>> your Layers Palette should look like figure to the right >>>


5. Resize canvas to Width = 750 pixels and Height = 375 pixels: Menu: >Image>Canvas Size
6. Reorder layers to simulate final collage above.
  - make layer active; move layers; prioritize; link and re-center composite
7. Add shadow to each photo using Layer Effects:
  - make the "dunes 1" layer active
- Menu: >Layers>Effects>Drop Shadow

- Enter Distance = 10; Blur = 10 and Intensity = 20
Use same layer effect on other two layers:
  - make the "dunes 1" layer active... Menu: >Layers>Effects>Copy Effects
- make the "dunes 2" layer active then: Menu: >Layers>Effects>Paste Effects
- make the "moss" layer active then: Menu: >Layers>Effects>Paste Effects
8. Enhance layer images using Menu: >Image>Adjust>Levels and/or Color Balance as desired
9. Save .PSD file
10. Flatten and save as .TIF
Revision1.1

Photoshop for Photographers ©
Bob DiNatale
Layers:1 to 3 Layer Basics ...for Everyone!
Keystrokes are for Windows... For lesson with Macintosh keystrokes Click here

Activity L3/101: Transforming and changing layer opacity.


1. Open the collage.PSD file
2. Create a new layer by clicking the "new layer" icon of the Layers Palette and name it "white"
3. Reset the "default" foreground and background colors to black and white by pressing the "D" key
4. Fill the newly created layer with white:

  - from the menu choose: >Edit>Fill: and in the "Contents" box select "Background Color" then "OK"

5. Prioritize the "white" layer by dragging it below all 3 photos
6. Open the file PSPcollage_D.jpg image

  - click the arrow located at the top right of the Layers Palette and select "Duplicate Layer"
- rename "Duplicate: Background" and name it "As" "texture" and for "Destination" select "collage"
(re-select PSPcollage_D.jpg and close the file)

7. Prioritize the "texture" layer by dragging it just above the "white" layer
8.
Transform "texture" layer to fill canvas:

  - from the menu choose: >Edit>Transform:Scale
- pull the top left "handle" to the top left of the canvas then
- pull the bottom right "handle" to the bottom right corner of the canvas
- press the "Enter" key to complete "scaling"
9. Change the "Opacity" of the "texture" layer to 10%
  - make the "texture" layer active
- click the mouse in the "Opacity number box and type "10"
(holding the "Shift" key while pressing the up/down arrows will change number value by 10)
10. Save .PSD file
11. Flatten and save as .TIF
Revision1.1
Home