Advance Digital Image Enhancement Method
Selections Techniques:
Reading: Chapter 2 "Selection Primer" - Studio Techniques
by Ben Wilmore
Lesson 4: Practice "The Method" using selections, layers and layer mask techniques
Objective: To learn how to create layer masks. To see how these masks, along with a portion of the image, when isolated on its own layer allow total control and the ability to reedit how much of the image is seen. Practice "The Method" to enhance the digital image.
Select and mask various face parts:
1. Open "Selection.tif" file.
2. Make the "Background" Layer active
3. With the "Rectangle" selection tool draw a bounding box slightly larger than face part...

{see "Face Parts List"}

4. Then, create a new layer [Option+Command+J] and name it... [use name from face part's list]
5. Then, make only new layer active and visible [Option+click layer-eye]
6. Then, begin the selection process:
  a) Zoom in to object... [draw bounding box with zoom tool]
b)
Choose the appropriate selection tool and create a selection of desired area

{see "Face Parts List"} ... [if necessary, use "Quick Mask" to refine selection]

c) When done selecting, add a layer mask: [click+ add Layer mask icon]
7. Then, double-click "Hand" selection tool to display entire image
{ --- repeat from Step 2 and select next "face part" from "Face Parts" }

- When done selecting all face parts continue -
Compose "Face", Flatten, and Save:
  1. Make ALL layers visible
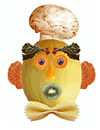
2. Move face part layers created above into place and prioritize to create face
... [reference example in upper right corner of file]
3. Save As "Melonhead.PSD" [editable file]
4. Shut off "Background" [only layers needed for final image are visible]
5. Flatten image:
Menu:>Layers>Flatten Image
6. Crop excess white from image
7. Save As "Melonhead.TIF" file with LZW compression [deliverable file]

8. Close files and end lesson
NEXT Lesson
Last Updated: 2/12/02


Advance Digital Image Enhancement Method
Selections Techniques... Lesson 4: Face Parts List

[Eye] Carrot and Blueberry:
1. Double click "magic wand" and set tolerance to 48 then click on carrot
2. Add to the selection with the "polygonal lasso" around Blueberry; then add layer mask

[Mouth] Kiwi:
1. Approximate selection with oval tool
2. Menu: >Select>Transform Selection and adjust; then add layer mask

[Left Eye Brow] Radish:
1. Select layer content [Command+layer_thumbnail]
2. subtract white from selection [Option+magic wand]; then add layer mask

[Ear] Orange Slice:
1. Use the Magnetic lasso to select the pulp; then add layer mask
2. Rotate layer: Menu:>Edit>Transform>Rotate 90° CCW

[Hat] Mushroom:
1. Select with "magnetic polygon"
2. Use Quick Mask to refine selection; exit Quick mask and add layer mask

[Bow Tie] Pasta:
1. Double click Magic wand tool and set tolerance to 8
2. Select and add multiple selections using the [Shift+magic wand] tool
3. Use Quick Mask to refine selection; exit Quick mask and add layer mask
4. Soften mask: Menu:>Filter>Blur More
... [if more blurring is desired [Command+F] repeats last filter

[Nose] Pear
1. Set tolerance of "Magic wand" tool to 32 [anti alias] and click in middle of pear
2. Select Similar (maybe several times); Select Grow (maybe several times), then add layer mask
3. Soften mask: Menu:>Filter>Blur More or [Command+F] to repeat last filter

[Head] Cantaloupe (with some face parts):
1. Use the Magnetic lasso to select the pulp; then add layer mask


To add a layer mask... [click+ add Layer mask icon]