|
Photoshop
for
Photographers ©
Bob DiNatale |
 Activity:
Layer Masks...
Activity:
Layer Masks...For lesson with Macintosh Keystrokes Click here
Lesson 1: Different ways of creating layer masks and moving the image independently of the mask.
| Part
1: 1. Open 3 files PSPballoons.tif; PSPclouds1.jpg; PSPclouds2.jpg 2. Make the "PSPclouds1.jpg" active 3. From the layers palette drag the "Background" thumbnail to the "PSPballoons.tif" file |
|
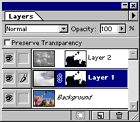
| >> you should now have 2 layers in the PSPballoons.tif" file << | |
|
4. Make
"Layer 1" active |
|
| >> you should now be looking at the balloons against a sky with clouds << | |
|
|
|
| Part
2: 1. Reload the "sky selection" from the menu: >Select>Load Selection 2. Make the "PSPclouds2.jpg" file active then select the entire area and copy it to the clipboard: |
|
| - [Ctrl+A] then [Ctrl+C] | |
| 3. Again, make the "PSPballoons.tif" file active and from the menu: >Edit>Paste Into | |
|
{notice:
a new layer, "Layer 2", and a layer mask were created
with the "Paste Into" command}
{notice: there is no link between the thumbnail and the mask} |
|
| 4. Reposition the clouds In "layer 2" behind the balloons: | |
| -
click on the picture thumbnail of "Layer 2"make
sure the clouds are selected [brush icon] - select the "move tool" and click anyplace in the "PSPballoons.tif" file then move the clouds |
|
|
{notice:
without the link, each layer element can be moved independently
- usually it's the photo}
|
|
| 5. Now move the clouds in "Layer 1" behind the balloons: | |
| -
shut of "Layer 2" - make "Layer 1" active and click on the picture thumbnail to select the clouds [brush icon] - now "toggle off" the link between the picture and mask icons by clicking on the link - select the "move tool" and click anyplace in the "PSPballoons.tif" file then move the clouds - after moving the clouds, re-link the picture and mask by clicking on the area between the icons |
|
| 6. Close file and Save: "PSPballoons.PSD" and end lesson | |