|
Advance Digital Image Enhancement Method |
Reading: Chapter 2 "Selection Primer" - Studio Techniques by Ben Wilmore
| Reminder: | ||
|
[Ctrl + clicking Layer Icon] will make a selection of layer
shape [Shift + Ctrl + clicking Layer Icon] will add layer shape to the selection [Alt + Ctrl + clicking Layer Icon] will subtract layer shape to the selection [Ctrl + E] will merge all linked layers with the active layer |
||
| Select all "face parts" by adding selections and then creating layers: | ||
| 1.
Open "Selection.tif"
file. 2. Make multiple selections of face parts and create new layer: |
||
| a) Using the "Rectangle Marquee",
select the pear then with the [Shift]
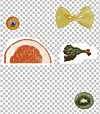
key down, add the mushroom - Make "Background" active and create a new layer [Ctrl+J] of these selections b) Using the "Elliptical" Marquee", select the carrot w/blueberry then with the [Shift] key down add the kiwi - Make "Background" active and create a new layer [Ctrl+J] of these selections c). Using the "Polygonal Lasso", select the radish then with the [Shift] key down select the orange slice - Make "Background" active and create a new layer [Ctrl+J] of these selections d) Using the "Magic Wand", select the pasta, then with the [Shift] key down add multiple selections to the pasta... you may need to adjust the tolerance of the "Magic Wand" - Make "Background" active and create a new layer [Ctrl+J] of selection |
||
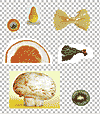
| 3. Make a new selection of all 4 layers shapes and create a new layer of selection: | ||
|
a) Make
a selection the shape of "Layer1": [Ctrl+click
Layer1 "thumbnail"] |
||
| 4. Create a new of layer containing all BUT the mushroom and pear: | ||
 a) Make a selection
of "face parts1" layer: [Ctrl+click
layer "thumbnail"]
a) Make a selection
of "face parts1" layer: [Ctrl+click
layer "thumbnail"]b) Subtract from selection the shapes of the mushroom and pear: [Alt+Ctrl+click Layer 1 "thumbnail"] c) Make "Background" active. d) Create a new layer of the selection and name it "face parts2": [Alt+Ctrl+J] e) Switch between layers "face parts 1" and "2": [Alt+click layer-eye-box] |
||
| 5. Link all "face parts" layers then merge and delete: | ||
|
a) Make layer
"face parts1" active and link layers "face parts2" and "Layers
1-4" |
||
