Advance Digital Image Enhancement Method
Selections Techniques:
Reading
:
Chapter 2 "Selection Primer" - Studio Techniques
by Ben Wilmore
Lesson 1: Review Adding and Subtracting Selections:
Keystrokes are for Windows... For lesson with Macintosh keystrokes Click here
Objective: To learn how to add and subtract selections.
Reminder:
  [Shift+tool] adds to selection; [Alt+tool] subtracts from selection
[While selecting: Hold down "Spacebar" to move the selection… release it to resize the selection] [Ctrl+Z] will revert to last selection
[Double click] any tool to see "Alt" settings

1. Open "Selection.psd" file.
2. Make the "Background" layer active
3. Using the "Rectangle Marquee" tool:
 

- Form a "T" shape selection over the mushroom by "adding" two selection:

a) Select the top half
b) With the [Shift] key down, add the bottom 1/2 to the selection

{when done, press [Ctrl+D] to deselect the selection}
 

- Form a "T" shape selection over the mushroom by "subtracting" two selection:
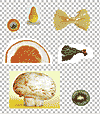
a) Select the entire mushroom
b) With the [Alt] key down, subtract the bottom right of selection
c) With the [Alt] key down, subtract the bottom left of selection
revision 2.5


Advance Digital Image Enhancement Method
Selections Techniques:
Reading: Chapter 2 "Selection Primer" - Studio Techniques
by Ben Wilmore
Lesson 2 Practice Selecting / Deselecting; Layer Merging and deleting:
Objective: To learn how to add and subtract layers.
Reminder:
  [Ctrl + clicking Layer Icon] will make a selection of layer shape
[Shift + Ctrl + clicking Layer Icon] will add layer shape to the selection
[Alt + Ctrl + clicking Layer Icon] will subtract layer shape to the selection
[Ctrl + E] will merge all linked layers with the active layer

Select all "face parts" by adding selections and then creating layers:
1. Open "Selection.psd" file.
2. Make multiple selections of face parts and create new layer:
  a) Using the "Rectangle Marquee", select the pear then with the [Shift] key down, add the mushroom
- Make "Background" active and create a new layer [Ctrl+J] of these selections
b) Using the "Elliptical" Marquee", select the carrot w/blueberry then with the
[Shift] key down add the kiwi
- Make "Background" active and create a new layer [Ctrl+J] of these selections
c). Using the "Polygonal Lasso", select the radish then with the
[Shift] key down select the orange slice
- Make "Background" active and create a new layer [Ctrl+J] of these selections
d) Using the "Magic Wand", select the pasta, then with the
[Shift] key down add multiple selections to the pasta... you may need to adjust the tolerance of the "Magic Wand"
- Make "Background" active and create a new layer [Ctrl+J] of selection
3. Make a new selection of all 4 layers shapes and create a new layer of selection:

a) Make a selection the shape of "Layer1": [Ctrl+click Layer1 "thumbnail"]
b) Add the shape of "Layer2" to the selection: [Shift+Ctrl+click Layer1 "thumbnail"]
... {Repeat "step 3b" with "Layers 3+4"}
c) Make "Background" active.
d) Create a new layer of the selection and name it "face parts1": [Alt+Ctrl+J]
e) View "face parts" layer separately: [Alt+click eye]

4. Create a new of layer containing all BUT the mushroom and pear:
a) Make a selection of "face parts1" layer: [Ctrl+click layer "thumbnail"]
b) Subtract from selection the shapes of the mushroom and pear: [Alt+Ctrl+click Layer 1 "thumbnail"]
c) Make "Background" active.
d) Create a new layer of the selection and name it "face parts2": [Alt+Ctrl+J]
e) Switch between layers "face parts 1" and "2": [Alt+click layer-eye-box]
5. Link all "face parts" layers then merge and delete:
 

a) Make layer "face parts1" active and link layers "face parts2" and "Layers 1-4"
b) Merge linked layers: [Ctrl+E]
c) Delete"face parts1"...
{your file should look as it did when you started }

Revision 3.0


Advance Digital Image Enhancement Method
Selections Techniques:
Reading: Chapter 2 "Selection Primer" - Studio Techniques
by Ben Wilmore
Lesson 3: Refining Selection Using Quick Mask
Objective: Learn how to use Photoshop's Quick Mask mode. Use keyboard shortcuts to enter and exit Quick Mask mode, toggle between fore and background colors and change brush size.
Quick Mask keyboard shortcuts:
  - "black" blocks (adds to the mask) and [white] clears (removes the mask)
- "X" on the keyboard toggles between black and white
- " [ " the left bracket selects the next smallest brush
- " ] " the right bracket selects the next largest brush
Select the kiwi and refine with Quick Mask:
1. Open "Selection.psd" file.
2. Make "Background" active
3. Use the "Rectangle Marquee" to select an area slightly larger than the kiwi
4. Create a new layer [Ctrl+J] containing the kiwi
5. Make only this new layer active and visible [Alt+click eye]
6. Draw a bounding box with the "Zoom" tool around the kiwi
7. With the "Magic Wand" set at a tolerance of 48, click near the edge of the kiwi
8. Press "Q" to enter Quick Mask and remove the red mask from the center of the kiwi:
  - Use the "Paint Brush" tool, to "add" or "subtract" from the mask:
 
- [black] blocks (adds to the mask) and [white] clears (removes the mask)
- "X" on the keyboard toggles between black and white
- the left bracket "[" selects the next smallest brush
- the right bracket "]" selects the next largest brush
Note: it's better to make the selection slightly smaller than the object
9. When done, press "Q" to exit Quick Mask and return to "Selection" (marching ants).
10. Add layer mask of selection: [click+ add Layer mask icon]
11. Soften mask: Menu: >Filter>Blur>Blur
12. Double Click "Hand" tool to show entire image.
 
Select the mushroom and refine with Quick Mask:
1. Make "Background" active
2
. Use the "Rectangle Marquee" to select an area slightly larger than the mushroom
3.
Create a new layer [Ctrl+J] containing the mushroom
4. Make only this new layer active and visible [Alt+click eye]
5. Draw a bounding box with the "Zoom" tool around the kiwi
6. Using the magnetic lasso, set the Edge Contrast to 10% and select around the edge of mushroom
7. Press "Q" to enter Quick Mask and refine the mask around edge of mushroom:
  - Use the "Paint Brush" tool, to "add" or "subtract" from the mask:
 

{ the polygon tool can be used and filled with black or white to Alter mask }

8. When done, press "Q" to exit Quick Mask and return to "Selection" (marching ants).
9. Add layer mask of selection: [click+ add Layer mask icon]
10. Double Click "Hand" tool to show entire image.
11. Toggle between "Layer 1 & 2" [Alt+click layer-eye-box] and view masked layers.
12. End session by closing file and DO NOT save
Revision 2.5


Advance Digital Image Enhancement Method
Selections Techniques:
Reading: Chapter 2 "Selection Primer" - Studio Techniques
by Ben Wilmore
Lesson 4: Practice "The Method" using selections, layers and layer mask techniques
Objective: To learn how to create layer masks. To see how these masks, along with a portion of the image, when isolated on its own layer allow total control and the ability to reedit how much of the image is seen. Practice "The Method" to enhance the digital image.
Select and mask various face parts:
1. Open "Selection.psd" file.
2. Make the "Background" Layer active
3. With the "Rectangle" selection tool draw a bounding box slightly larger than face part...

{see "Face Parts List" below}

4. Create a new layer [Alt+Ctrl+J] and name it... [name = selected face part]
5. Make only new layer active and visible [Alt+click layer-eye]
6. Begin the selection process:
 

a) Zoom in to object... [draw bounding box with zoom tool]
b)
Choose the appropriate selection tool and create a selection of desired area
... [if necessary, use "Quick Mask" to refine selection]
c) When done selecting, add a layer mask: [click+ add Layer mask icon]

7. Double-click "Hand" selection tool to show entire image
{ --- repeat from Step 2 and select next "face part" from "Face Parts" }
- When done selecting all face parts continue -
Compose "Face", Flatten, and Save:
  1. Make ALL layers visible
2. Move layers into place and prioritize to create face
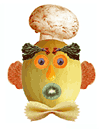
... [reference example in upper right corner]
3. Save As "Melonhead.PSD" [editable file]
4. Shut off "Background" [only layers needed for final image are visible]
5. Flatten image:
Menu:>Layers>Flatten Image
6. Crop excess white from image:
... [Use "Crop Tool" found in Marquee Tool group]
7. Save As "Melonhead.TIF" file with LZW compression [deliverable file]

8. Close files and end lesson
Revision 3.0


Advance Digital Image Enhancement Method
Selections Techniques... Lesson 4: Face Parts List
 

[Eye] Carrot and Blueberry:
1. Double click "magic wand" and set tolerance to 48 then click on carrot
2. Add to the selection with the "polygonal lasso" around Blueberry; then add layer mask

[Mouth] Kiwi:
1. Approximate selection with oval tool
2. Menu: >Select>Transform Selection and adjust; then add layer mask

[Left Eye Brow] Radish:
1. Select layer content [Ctrl+layer_thumbnail]
2. subtract white from selection [Alt+magic wand]; then add layer mask

[Ear] Orange Slice:
1. Use the Magnetic lasso to select the pulp; then add layer mask
2. Rotate layer: Menu:>Edit>Transform>Rotate 90° CCW

[Hat] Mushroom:
1. Select with "magnetic polygon"
2. Use Quick Mask to refine selection; exit Quick mask and add layer mask

[Bow Tie] Pasta:
1. Double click Magic wand tool and set tolerance to 8
2. Select and add multiple selections using the [Shift+magic wand] tool
3. Use Quick Mask to refine selection; exit Quick mask and add layer mask
4. Soften mask: Menu:>Filter>Blur More
... [if more blurring is desired [Ctrl+F] repeats last filter

[Nose] Pear
1. Set tolerance of "Magic wand" tool to 32 [anti alias] and click in middle of pear
2. Select Similar (maybe several times); Select Grow (maybe several times), then add layer mask
3. Soften mask: Menu:>Filter>Blur More or [Ctrl+F] to repeat last filter

[Head] Cantaloupe (with some face parts):
1. Use the Magnetic lasso to select the pulp; then add layer mask


To add a layer mask... [click+ add Layer mask icon]
Revision 3.0
Home