|
...CONTINUING
from Lesson 2
2.
Open the Digital Master tif file:
- Optimize image using "Levels
Adjusting
Layer: Menu:
Layers>New Adjust Layer>Levels
- Using
"The Method:Enhanced
Master"
continue to adjust "the
wall" accordingly:
|
| |
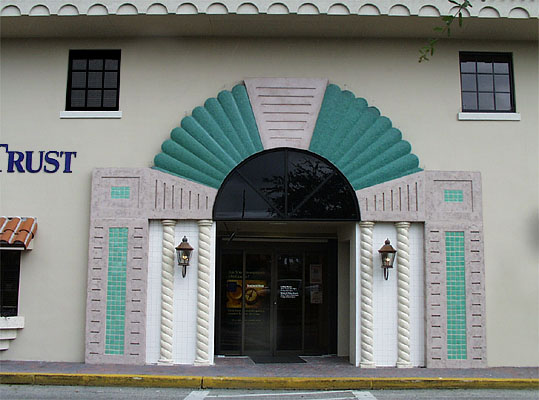
a) Lighten the archway door |
| |
|
[Hint:
make a new layer w/mask, set blend mode to "Screen" then
adjust layer opacity] |
| |
b) Add "green to wings"
above door |
| |
|
[Hint:
select "wings" and add "Color Balance" Adjustment Layer] |
| |
c) Add coral color to side
panels and section over door |
| |
|
[Hint:
with rectangle tool make multiple selection of each panel (left,
right and top) and create a make a new layer via copy; using the
polygon tool, add selections of each panel then subtract inner sections
of left and right panels. Use "Hue/Saturation" Adjustment Layer
and check "colorize" box] |
| |
d) Tint wall cream color |
| |
|
[Hint:
select wall with multiple magic wand selections. Some of the "panels"
and "wings" will also be selected. Subtract the "wings"
and "panel" from the selections by [Option+click} their
layer masks. Switch to Quick Mask Mode and clean up with brush.
Use "Adjustment Layer" to colorize] |
| Advance
if you dare: |
| 3. Add cloud reflection
to left top window: |
| |
a)
make selection of "left" window area
b) open "Clouds.JPG" file then "Select All" clouds and
copy to clipboard: [Command+A]
; [Command+C]
c) Return to
"TheWall_DM.psd" file then place clouds inside window: |
| |
|
-
Menu:>Edit >Paste Into
...Notice Layer Mask has NO Lock! |
| |
d) Move clouds to get desired area
behind window
e) Change "opacity" of "cloud layer" as desired - Name layer as
"clouds in window"
|
| 4. Remove cobwebs
around green wings with rubber stamp and protective selection |
| |
[Hint:
Select the "green wing" shape by [Option+click] wings
layer masks. Inverse the selection - this protects the green wings.
Then rubber stamp section of wall area near wings and obliterate
the cobwebs without worrying about over-stamping green wings.] |
5. Save file as "TheWall_EM.PSD"
[EM= Enhance Master... re-editable file]
6. Flatten layers and Save as "TheWall_EM.TIF" ...file
for distribution. |


 Remove
the shadow from the wall at right edge of image: