A
dvanced Digital Image Enhancement Method © Bob DiNatale

The A.D.I.E.M. "Print Calculator" is a device to help balance your prints for tonal and color range.
( If you do not have this file email me and I'll send it to you.)

You are welcome to use the calculator if you agree to the following terms:
1. You DO NOT SELL OR INCLUDE this info in any publication.
(Please contact me for republication rights)
2. Anyone who uses the A.D.I.E.M. "Print Calculator" will please e-mail me and provide feedback as to its usefulness.
3. Teachers are welcome to use this info as long as proper credit and site reference are given.
4. Do not change the copy or intent of this info. (Let me know if I made an error or if you disagree with any of my claims.)

How to Use the APC:
When viewing the APC on your monitor all tones should look neutral. If tones are not neutral then all adjustments to your images will be incorrect. Calibrate your monitor before continuing with image adjustments. [visually balancing your monitor for the neutral using the "print calculator" will help]

A. Print the APC to determine the Tonal Range for each paper to be used:

1. Print the APC
2. Determine the first visible step above black and enter the value in the "Dmax" box.
3. Determine the first visible step below white on the right column and enter the value "Dmin" box.
B. Adjust the "Dmin", "Dmax" and "Mid-Gray" values:
[Notes: make Photoshop "Info" palette visible in RGB and HSB color modes; there may be no adjustment for white value]
1. In Photoshop, select from the menu: >Image>Adjust Levels
2. In the bottom "Output" sliders, enter "Dmax" value for black (left box)
3. In the bottom "Output" sliders, enter "Dmin" value for white (right box)
4. Click the "gamma" (middle box of the upper "Input" sliders) and place the cursor on the midgray background of the APC
5. With the keyboard arrow keys, adjust the gamma (gray values) so RGB=128 or HSB "B"=50%.
6. Reprint the APC with the "adjusted "black" white" and gray" values.
C. Determine color balance adjustment if background in not neutral gray:
[Note: Wait for print to dry before evaluation! View test in light that prints will be viewed]
1. Punch a hole in a standard photographic gray card.
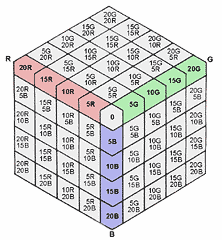
2. Move hole in "gray card" around the "color cube" and choose the color chip that matches.
3. Determine the color value of the chip that produced neutral gray. (see chart below)
4. In Photoshop, select >Image>Adjust>Color Balance and enter values found in step 3.
D. Printing your file on tested paper:

[Important: Wait for print to dry before evaluation! View test in light that prints will be viewed.]
1. After all Photoshop file enhancements and prior to printing:*
2. Enter "Dmax", "Dmin" values found in "A" and "gamma" value found in "B" above.
3. Enter "color balance" values found in "C" above.
4. Print file.
...{*Note: It would be helpful to make an "Action" for step 2&3 for each paper you use}

Version 1.1
E-mail comments: APC@BobDiNatale.com

The A.D.I.E.M Print Calculator © Bob DiNatale
Overview:
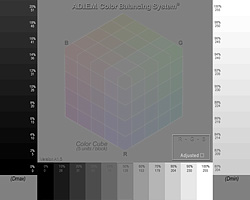
Print the A.D.I.E.M "Calculator" with the printer and paper being tested. Use the left grayscale to determine where black occurs and the right grayscale to determine where white occurs. Enter these values in Photoshop's "Levels:Output" menu to adjust for maximum black (Dmax), maximum white (Dmin) and then adjust for mid gray. This will open up your shadow detail while maintaining your highlights. [Optional... Make a second print with these adjusted values and use the center "color cube" to determine the color balance needed to produce neutral gray]. Apply the "Levels" [and optional "Color Balance"] adjustment(s) prior to printing your Photoshop file on the tested paper. The A.D.I.E.M. "Calculator" can be used for any printer with any print media.
Description: [ ALPHA 1.3 ]
The A.D.I.E.M "Calculator" has 3 Grayscales, a color cube and 4 info boxes:
Each grayscale has 11 steps with brightness values in both percent and 8 bit number value.
- The bottom grayscale steps range from 0% to 100% in 10% increments
- The left grayscale steps range from 20% to 0% in 2% increments
- The right grayscale steps range from 100% to 0% in 2% increments
- The background is mid-tone gray (Brightness = 50%; RGB values = 128)
- The center "color cube" has an RGB axis that changes in 05 units or color.
- Info boxes: Dmin; Dmax; Mid-gray and RGB\Adjusted
Design considerations:
- The A.D.I.E.M "Calculator" is intended to be printed at 200 PPI which will produce a 4x5" print. This will allow the use of a 4"x 6" inch paper or 4 tests to be done on 1 8x10" piece of paper.
- The left and right grayscales ((Dmax and Dmin respectively) are in 2% increments to evaluate subtle changes in shadows and highlights.
- The gray scales bleed the left, bottom and right edges of the calculator so when APC is trimmed they can be to compared to the "adjusted" prints.
- Mid-tone background is to aid in color adjustment on screen and over color cast of the print.
- The "color cube" individual color chips in 5 units* changes are sized to be view through hole punch.
- Notation boxes to enter "Dmax", "Dmin" and "gamma" (50% step in bottom scale) values for B&W and the "R - G - B" box to enter color balance adjustment.

* A.D.I.E.M. Print Calculator "color cube" RGB values in 05 units of change.
E-mail comments: APC@BobDiNatale.com
Click here to go to Bob's site